Auxilio Chrome extension or how I boost my productivity
I'll be honest and I'll say that I'm a bit lazy sometimes. I'm one of those developers which don't like to repeat same actions again and again. There are dozen of things which I have to do while working on a project. Very often I'm covering the development of several applications and have to switch between them. It's really annoying process. I hate to have many opened tabs in my browser, many consoles or several code editors. I always try to improve my productivity by automating tasks. I think that even switching between opened applications takes too much time.
Auxilio is an extension for Google Chrome which helps me to solve some of the above problems. During the development I realize that it's much more then a tool for workflow optimization. Here is what I'm using it for:
interactive shell/console
file browser
front-end testing
real-time code editing
git helper
project manager / workflow optimization
profiling
marker
playing tetris :)
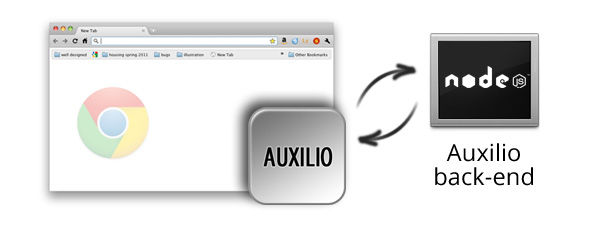
Before to give you more details about every of the items above, let me clarify how everything works. Auxilio has two parts. The first one is of course an extension of my favorite browser and the second one is a nodejs application, which I called auxilio-backend. The extension uses web sockets (socket.io) and connects to the node app. You can do a lot of stuff inside your browser. However, there are some tasks which are not permitted. For example you can't watch file for changes or execute shell commands. For these things I decided to use node, because:
- it's simply JavaScript and I'm able to write whatever I want
- it has a lot of modules, which I can use.
If I need to do something inside the browser I'm using the Google's APIs, while the back-end is taking care about the OS related stuff. The extension just sends commands and gets response.
Installation
Auxilio back-end
First of all install NodeJS. It's pretty easy. Just go to nodejs.org and click the big green button. The back-end is distributed as node package, so you can easily install it via the node package manager.
npm install -g auxilio-backend
Once everything completes simply run it via
auxilio-backend
You should see
info  - socket.io started
Auxilio back-end started.
Auxilio Chrome extension
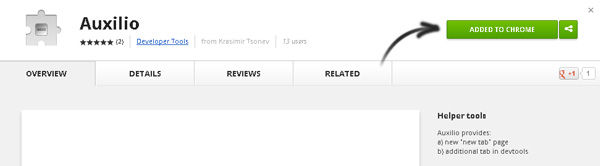
There are two ways to use an extension for Chrome.
- Open this url and click Add to Chrome button in the upper right corner.
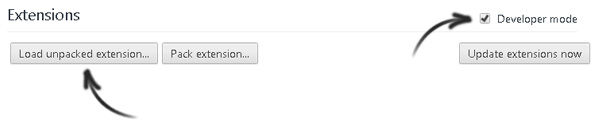
- Download the source code from the GitHub repo. Open chrome://extensions page and check Developer mode. After that click on Load unpacked extension and browse the /src directory.
Usage
New tab page
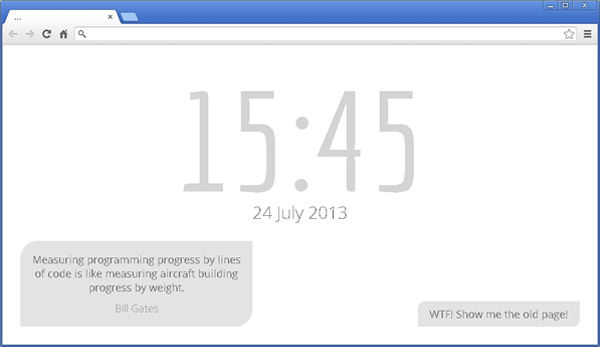
When you open a new tab Chrome usually shows most visited pages. There are some other things like recent closed pages or installed apps, but actually I didn't use them very often. That's why I decided to customize that part of the browser. The new page shows the current date and time, good quotes made by smart developers and of course a button which points to the old page if needed.
DevTools tab
DevTools is a great instrument for programmers. Luckily there is an API which we can use to add new tabs. It is also good that you can open the panel with shortcuts like Ctrl + J or Ctrl + I. However, there is no way to associate a shortcut to your custom tab. So, what I'm doing is to open DevTools and use Ctrl + [ or Ctrl + ] to navigation between the tools.
Interactive shell/console
Auxilio has its own defined commands. I mean every time when you send something, it firstly checks if there is an Auxilio command registered. If not then it sends the string to the nodejs app, which calls exec:
exec(command, {
        encoding: 'utf8',
        maxBuffer: 1020*1024,
    }, function (error, stdout, stderr) {
        ...
    }
);
This means that every command which is accessible via the console of your OS is available inside your browser. There is one thing to notice here. The backend uses exec, not spawn to execute shell commands. In other words, the extension shows the result only if the whole output of the process is collected. So, if you have a long git push to be made then Auxilio will print the result with a big delay. I'm developing the extension under Windows and I wasn't able to finish the implementation, which uses spawn. It's just a little bit tricky. Here is a short video, which shows how Auxilio work:
File browser
We all use some kind of a file browser. Maybe you are using the console, the native Windows Explorer or Konqueror for Linux. In every cases you have to switch between your browser and some other application. It takes time. Very often I just want to see the files in particular directory or just two levels of the folders' tree. That's why I implemented such functionality in the extension.
Every file browser has three major functions
- changing directories - as you can see in the video the good old cd works here. That's native OS command. Notice that once you type slash / Auxilio shows you a little hint. Small popup slides from the left part of the screen and displays the current folders and files. Also, the content of the current directory is available in the autocomplete mechanism, so you don't have to type the whole paths. Just press tab key and Auxilio will complete the word.
- tree view - sometimes you need to take a look a little bit deeper in the directories' tree. There is a custom command tree which nicely shows what you want. It also accepts a deep level.
- filtering - of course I needed to filter the results sometimes. Very often I need to see only the javascript files or less files. Again the tree command is used, but instead of deep level you can pass regular expression.
All the three points in action:
Have in mind that the tree command outputs actually links. By clicking on directory you are changing the current one. If you click on a file it simply sends it to the OS's console.
Front-end testing
To be honest that's the main reason to start working on the extension. I checked the API very careful and saw that I can interact with the current page and the browser itself. I'm a fen of test driven development and I wish I could have tests for everything. Unfortunately, there are some areas which are not exactly testable. The front-end user interface is one of those things. The popular approach for such tasks is to use headless browser like Zombie.js, PhantomJS or Selenium. I.e. something which acts as a real browser but accepts commands from you. I worked for a while with ZombieJS, but it was a little bit difficult. Maybe because it's not exactly real browser. At that time I thought that it will be cool if I'm able give instructions to Google Chrome. The answer was - yes, it is possible.
Auxilio scripting
Before to continue with the real testing I have to introduce something, which I call Auxilio scripting. That's pure JavaScript stored in an external file. It is later imported and executed in the context of the extension. I.e. all the commands defined in Auxilio are available for those scripts as global methods. If you want to see the existent functions just type man. Every script has the following format:
function nameOfCommand(args, callback) {
    // your logic here
}
There are few things to clarify here:
- pay attention to the name of the file. That's the name of your command and you will later access it via that string. For example if your file is called push_to_production.js, you will be able to call push_to_production in the Auxilio's command line input field.
- always call callback() at the end. If you miss that your command can not be used in a commands chain.
- use args to take parameters sent to your command
Here is an example:
function nameOfCommand(args, callback) {
    var commitMessage = args.length > 0 ? args.join(" ") : false;
    if(commitMessage === false) {
        error("Sorry, please type a commit message.");
        callback();
    } else {
        echo("Pushing to production with message = '" + commitMessage + "'");
        callback();
    }
}
The command is saved as push_to_production.js. It accepts only one argument, so whatever you pass to it, is joined in a string. To import your script to Auxilio just type
run push_to_production.js
What will happen is that your function will be registered as a command for later usage. If you want to use it immediately then your file should start with exec.. In our case this should be exec.push_to_production.js. How this works is shown in the video below. Here is the code of exec.push_to_production.js.
function nameOfCommand(args, callback) {
    info("Pushing to production directly.");
    callback();
}
Writing front-end tests
Ok, now you have a rough idea how to write scripts for Auxilio. If you have experience with TDD you probably know some cool framework, which shows the results of the tests and provides some good assertions. For client-side JavaScript I normally use Jasmine. That's why I directly integrated the framework into the extension so you can use global functions like describe or it.
So, let's say that we want to test the search functionality of GitHub. We start by writing the body of our test:
function testingGitHubSearching(args, callback) {
    describe("Testing GitHub searching", function() {
        // test logic here
    });
    callback();
}
Let's save the file as exec.github.search.spec.js. The next step is to open github.com:
it("should load github.com", function(done) {
    load("github.com", done);
});
It's that simple. load method is a global function defined in Auxilio. It accepts only url and callback. Jasmine expects the calling of its done method in order to continue with the next assertions. Have in mind that load function calls its callback once the page is fully loaded, which is good because in most of the cases we need that.
The next thing is to fill the search input field on top of the GitHub's home page.
it("shoud type 'auxilio' in the search bar", function(done) {
    pageinsertjs('document.querySelector("#js-command-bar-field").value="auxilio";', done);
});
As you can see we insert a short js snippet, which is executed in the context of the current page. It simply fills the search field. After that we have to submit the form:
it("shoud submit the form", function(done) {
    pageinsertjsw('document.querySelector("#top_search_form").submit()', done);
});
Notice that we are calling pageinsertjsw and not pageinsertjs. The w at the end is coming from wait. I.e. pageinsertjsw waits till the page is reloaded. At the end check if the current page contains h3 element with krasimir/auxilio in it.
it("should have h3 element which contains 'auxilio'", function(done) {
    pagequery('h3', 'krasimir/auxilio', function(res) {
        expect(res.elements >= 1).toBe(true);
        done();
    })
});
Auxilio also can create a screenshot for you. So, why not adding this as a last step and the full test looks like that:
function testingGitHubSearching(args, callback) {
    describe("Testing GitHub searching", function() {
        it("should load github.com", function(done) {
            load("github.com", done);
        });
        it("shoud type 'auxilio' in the search bar", function(done) {
            pageinsertjs('document.querySelector("#js-command-bar-field").value="auxilio";', done);
        });
        it("shoud submit the form", function(done) {
            pageinsertjsw('document.querySelector("#top_search_form").submit()', done);
        });
        it("should have h3 element which contains 'auxilio'", function(done) {
            pagequery('h3', 'krasimir/auxilio', function(res) {
                expect(res.elements >= 1).toBe(true);
                done();
                screenshot();
            })
        });
    });
    callback();
}
Once the test is ready we have to run it with runjasmine.
Real-time code editing
I implement this feature just for fun, but later I found that it is somehow helpful. The idea is to edit source code directly inside the browser and see the changes immediately. To make this possible I needed two things:
- Code editor inside Auxilio - I decided to use ACE because its integration was easy
- Nodejs watcher - something which watches files or directory for changes and send notifications to the browser
Here is a video which illustrates how everything works:
Few things happened. In the video I used watch. The format of this command is:
watch [operation] [id or path] [callback command]
And I run:
watch start ./ refresh
telling "start watching the current directory and if something is changed call another command called refresh". As you may guess refresh reloads the current page of the browser.
The editor is really simple, but I added few shortcuts which helps a lot. Ctrl + S saves the current file. With Ctrl + [ or Ctrl + ] you can change the loaded files. Esc closes the editor.
Instead of refresh you can specify your own command containing shell instructions or other tasks for the browser.
Git helper
Git is my favorite version control system. All my projects are managed with it and git is maybe the word which I type most often. In this chapter I want to share few scripts, which I wrote and which are related to git. (In the functions below I used a small library called Chain.js. If you want to read more about it visit this link)
At some point I decided to add the current's git branch and current status to the place which shows the current directory. That's really helpful, because it is self updated and you know what is the state of the repository.
Committing
function ci(args, callback) {
    var message = args.join(" ");
    Chain()("done", callback)(
        [shell, 'git add .'],
        [shell, 'git commit -am "' + message + '"']
    );
}
The above command is used like that
ci My commit message
I.e. the main improvement is the skipping of the quotes.
Committing to master branch
function commitAndPushToMaster(args, callback) {
    Chain()("done", callback)(
        [ci, args.join(" ")],
        [push, "master"]
    );
}
Status
function status(args, callback) {
    exec('git status -sb', callback);
}
Logging
function gitlog(args, callback) {
    var numberOfCommits = args.length > 0 ? parseInt(args[0]) : 10;
    shell('git log -' + numberOfCommits + ' --name-status --format="%n-- %s%n%cn%n%ai / %h"', callback);
}
Here is a short video showing some of the above scripts.
Project manager / workflow optimization
If you work on several projects and you have to switch between them you probably need different tabs opened. I don't like to have a lot of tabs, so I close everything and open only what I need for the current project. Together with that I need to open several files, few editors or just to execute a shell command. The availability to write scripts for Auxilio and the fact that it has an access to my local files means that I can automate my workflow. The script below demonstrates the idea:
function projectName(args, callback) {
    Chain()("done", callback)(
        [cd, 'D:/work/Company/Project'],
        [newtab, '... wiki path'],
        [newtab, '... cms path'],
        [newtab, '... front end path'],
        [newtab, '... documentation path'],
        [shell, 'grunt']
    )
}
Going to the project's directory, opening the necessary tabs and at the end running Grunt.
Profiling
Ok, you have bunch of scripts, but it is annoying to call run every time. There is profile command. It accepts a path on your hard drive. Every time when you open Auxilio tab in DevTools it reads all the files in that directory and registers or executes your predefined commands. My scripts are available in GitHub here.
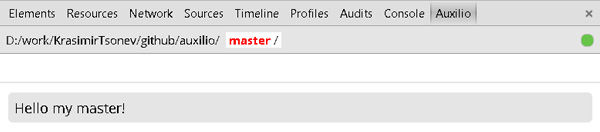
Have in mind that you could create scripts starting with exec. and basically initialize something with the running of Auxilio. For example, I displayed a simple message:
// exec.index.js
function profile() {
    exec("echo Hello my master!");
}
The result is
Manuals / Helper pages
There are a lot of commands available in Auxilio. Without documentation their usage will be messy. That's why I decided to write the manual page for every command together with its code. Following this approach guarantees that every command will be documented. For example the echo command looks like that:
Commands.register("echo", {
    requiredArguments: 1,
    lookForQuotes: false,
    concatArgs: true,
    run: function(args, callback) {
        ... implementation
    },
    man: {
        desc: 'Outputs message.',
        format: 'echo [text]',
        examples: [
            {text: 'Command line', code: 'echo Hello world!'},
            {text: 'In script', code: 'echo("Hello world!", function(res) { console.log(res); });'}
        ],
        returns: 'string',
        group: 'messages'
    }
})
The command, which displays the manual page is called man and if you call it without any parameter will show you all the functions.
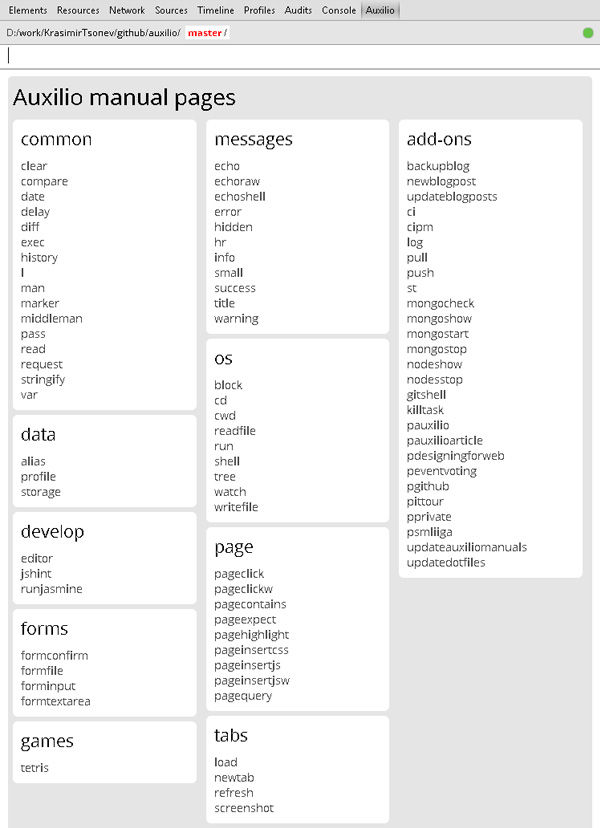
Notice that there is a column which shows the external scripts imported in Auxilio.
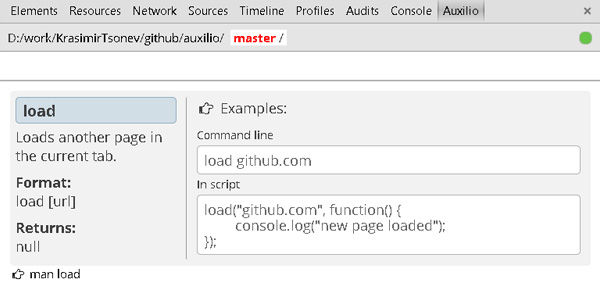
If you click no some of the commands or simply type man [name of command] you will see something like this:
Playing tetris
I like tetris. I played a lot when I was a kid. Having this inside my browser is kinda cool.
Marker
Very often I need to show something to my colleagues. Usually I made a screenshot of the browser, paste the image in photoshop and start adding markers. Later, I use these markers inside my emails. I thought that it will be cool if I add this to Auxilio.
Conclusion
Auxilio changed my workflow a bit. I mean, it saves time by automating some processes and of course helps with UI testing. Yes, I know that it is not perfect, but I'm trying to resolve as many bugs as possible. If you want to contribute feel free to fork the repository in GitHub. If you have any suggestions or just a script which you want to share please comment below.