Reactive UI in 10 lines of code
 Photo by Solen Feyissa
Reactivity became de-factor a standard in the last couple of years. All the major frameworks have some reactivity model implemented. One of the biggest even has the name React. In this article, we'll see how to write a simple reactive UI with just a few lines of JavaScript.
The Proxy
When talking about reactive UI, we usually mean an interface that updates itself automatically when the data changes. This approach became popular because it makes the development easier to understand and maintain. There is only one source of truth, and we only care about updating it without considering the actual UI updates.
There is a native browser API that we can use to achieve that reactivity. It's the Proxy object.
The Proxy object enables you to create a proxy for another object, which can intercept and redefine fundamental operations for that object.
This means that we can inject code when we are setting or getting a property of the proxied object. Here's a simple example:
const target = {
  name: "Foo"
};
const handler = {
  get(target, prop, receiver) {
    return "Proxied: " + target[prop];
  },
};
const proxy = new Proxy(target, handler);
console.log(proxy.name); // Proxied: Foo
The proxy constant is almost identical to our original target. It contains the name property, too, but instead of Foo, its value is Proxied: Foo.
Together with get, we also have a set method. So, we can do the following:
const target = {
  name: "Foo"
};
const handler = {
  get(target, prop, receiver) {
    return "Proxied: " + target[prop];
  },
  set(obj, prop, value) {
    obj[prop] = 'Bar';
  }
};
const proxy = new Proxy(target, handler);
console.log(proxy.name); // Proxied: Foo
proxy.name = 'A new name value';
console.log(proxy.name); // Proxied: Bar
Notice how even tho we set the value of name to 'A new name value' at the end we get Proxied: Bar. That's because the setter takes control, and it assigns Bar as a value. Later, we return the prefixed Proxied: Bar because we have a custom getter.
Now, let's use a setter to make reactive UI.
Reactivity in 10 lines of code
The reactive model most of us use now could also be defined as a one-directional data flow.
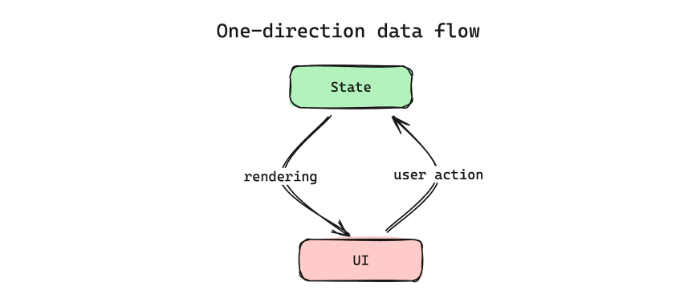
It's a simple idea where we have our state, and our UI is a function of it. Then, every user interaction leads to a state change, and the rendering back happens automatically. If we want to change the interface, we will not go to the DOM but change the state. This is the reactivity that we want to achieve here. With the Proxy API, we can do it with just ten lines of code:
function createReactivity(initialState, onUpdate) {
  const proxy = new Proxy(initialState, {
    set(obj, prop, value) {
      obj[prop] = value
      onUpdate.call(proxy);
    }
  });
  onUpdate.call(proxy);
  return proxy;
}
The createReactivity accepts our initial state object and a callback function that will be fired whenever the data is updated.
The actual practical example looks like this:
<div id="container"></div>
<input autofocus />
<script>
  function createReactivity(initialState, onUpdate) {
    const proxy = new Proxy(initialState, {
      set(obj, prop, value) {
        obj[prop] = value
        onUpdate.call(proxy);
      }
    });
    onUpdate.call(proxy);
    return proxy;
  }
  const state = createReactivity({ name: 'Krasimir' }, function () {
    document.querySelector('#container').innerHTML = `
      <h1>Hello, ${this.name}</h1>
    `;
  });
  const input = document.querySelector('input');
  input.addEventListener('input', e => state.name = e.target.value);
  input.value = state.name;
</script>
And you can see it in action here.
Whenever we change the input field's value, we update the name property of the proxied object. This leads to calling the setter and firing the onUpdate callback, which applies a new HTML to the #container element.