Why and how I built my own alternative of the GitHub's UI
I'm using Git and GitHub in particular a lot. And when I say a lot I really mean all the time. Recently I tracked a week of work and found that 62% of my working time goes into code reviews. Sometimes I'm checking out a branch locally and trying stuff but really most of my time goes into github.com. I spent some time analyzing why the code review process is so time consuming for me. I identified couple of reasons, made a tool and changed some of my habits. In this article I'll show you how I improved my code review speed and lower the time to 38%.
This article is an introduction to igit.dev. I spent two months developing the app and now completely replaced github.com for me. I moved there to manage my GitHub pull requests. This blog posts explains why I did it and briefly talks about how this happened.
IGit completely relies on GitHub's API. It is not communicating with your Git repository directly.
If you are interested in the technical side of the things jump to the "How" section.
Why
I know what you are thinking - "Why the hell you'll spend so much time and effort creating something that already exists?". Well, everything started as just a learning exercise. I just wanted to play with GraphQL and dig deeper into React hooks. I needed a project which is complex enough and communicates with a big GraphQL API. GitHub's v4 API is exactly what I needed. In the beginning I started by just listing the pull requests of two specific private repositories. Then I read the documentation and realized that I can actually build my own github.com and solve some of my productivity problems.
I work in a team of four front-end developers. We're doing several SPAs and couple of micro-services that are all written in JavaScript. The React applications that we develop are kinda similar in a sense that they share the same components but they serve completely different purposes. Despite the fact that we are trying to keep them consistent their implementation diverge. Which means that when I jump from application to application I have to pay a price - my brain switches contexts. The scope and code logic are different. Now imagine that I work on application A and I have to review PRs on application B and C. This is by far the most expensive item in my 62% code review bucket time. For a while I was fighting with that by trying to group the code reviews per app or review the one which is close to the area where I currently work. But that was definitely not feasible because I can't control what type of work my colleagues do. Then I realized that I can't beat the context switching but I can help myself build/restore the right context quicker. I realized that the re-building of the context is the thing that makes me tired. The rest is fun. I love to read code and judge it. It's just I don't feel comfortable when I don't know enough for the area of change. So, I first aimed for clarity and understanding of the context.
Building the context
Overall picture
There are couple of things that I noticed are missing in github.com which I actually need. Think about your work from above and try to draw the most generic picture in your head. In my case this looks like a list of repositories and their pull requests. Like one-level tree that shows all the work which is happening at a given moment. Now try to find such UI at github.com. We do have github.com/pulls which is a page with powerful capabilities. If I use the filtering I can actually provide a list of all the PRs that I'm interested in but they are not exactly split by repositories. What if I have three or more projects to look after. I need a visual cue that helps me divide the work. That is the very first thing which I did:

The side menu of IGit displays the repositories which I'm following and expands one of them at a time.
That little sidebar helped me unload the overall picture. So far I was keeping it in my head and constantly rebuilding it couple of times per day.
The scope of change
Having the overall picture I'm ready to dig into a specific pull request and do my code review.
I believe that this is valid not only for me but for most people. The code review almost always starts with reading the PR's description. That's cheap and it doesn't take a lot of time. Over the years I always pushed for a better description. Mainly because I'm working remotely and having everything documented makes the things a lot easier for me. For example we came up with the following pull request template:
**Ticket:** [](https://<...>.atlassian.net/browse/<...>)

## Why?
Why is this PR being filed? What problem does it solve, what need does it fill?

### Documentation
If appropriate, link to any internal or third party documentation which would
help your reviewer understand the context of this PR.

## What?
On a high to moderate level, what solution did you develop in this PR?

## Notes
If appropriate, provide some additional notes relevant to the PR.

For example:

- References to code changes that may have been made which are
  distinct from the main concerns of the PR
- Breakdown of code changes which may not be obvious for others
  to understand
- Etc.

## Ticket acceptance
List detailed steps to be followed during QA review of this work.
Each of the sections helps me build the context. Sometimes just reading the "Why" section is enough. Another time I only need to read the "Ticket acceptance" steps to understand what is going on. This type of reading helps me put myself into the shoes of the developer creating the PR. It saves tons of time because it presents all the gotchas and tricky parts in a simple list. So, if you are about to improve your code review process start from there. Ask for better description.
Implementation
After reading the title and the body of the pull request I may focus on the implementation. Let's say that I have an idea of what and where the changes are. I open the Files changed tab and start scanning the files. And here is the second thing which I'm missing in GitHub's UI. I don't want to see a list of files but a tree. The lists are difficult to grasp. It's difficult to isolate source code. And I don't know about you but we spent a lot of time organizing our code into proper folders. They all have carefully picked names and locations. And that page at github.com where I'm suppose to review the code fully discard our efforts in this direction because I have to scan all the files and shape visually a diagram of the directories which are touched. This was the reason why I put a simple tree view just after the description of the PR. The UI just simply follows my code review process - (1) reading the PR's title/body, (2) finding what parts of our system are changed.
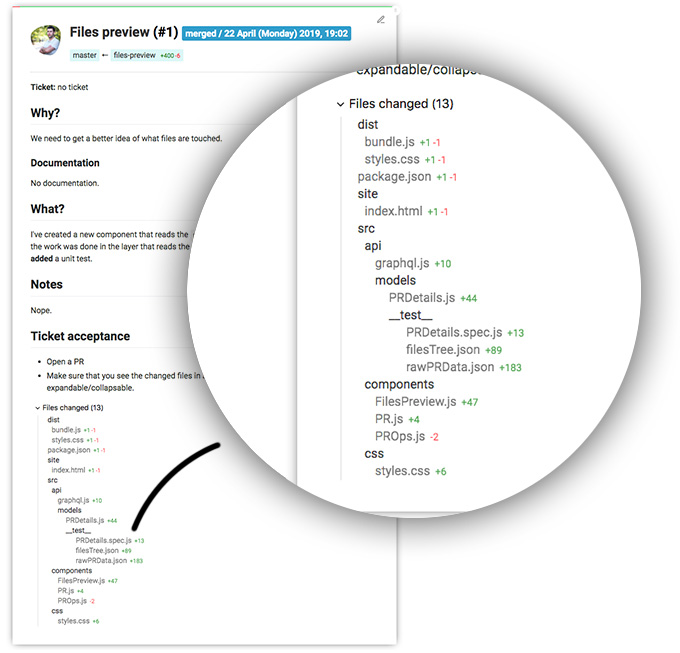
Look at that screenshot and focus on the src folder. If I know the codebase I can easily identify the bits which are modified. The developer made changes in the models and also probably added a new component called FilesPreview. And I got this information just by looking at the tree. I didn't read a single line of code and at this point I already know some implementation details.
Code reviewing
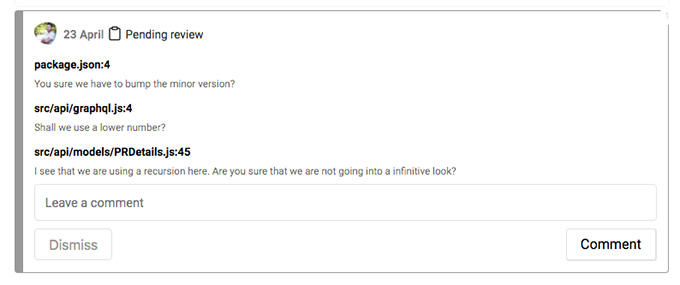
Once I gather enough context I can start reading the code changes. I already speed up the process by quickly scoping my brain to the right areas. Now I need to dive into the actual source code. There is one thing that GitHub team did and I absolutely love it. That's the ability to fold and expand the files' diff. That little button on the very far right side of each file.

I've made a habit to collapse the files that I already checked. This helps me build a pattern and better visually organize my progress. I copied that feature to IGit.

Sometimes when I'm not sure about something I leave the file expanded and move forward. Then I go back when I have enough knowledge to judge. Like on the screenshot above I leaved the site/index.html file because I'm not sure how this change happen.
After scanning all the files I have a nice collection of comments. I'm a step away from finishing my code review. I just have to review my review and prepare a constructive feedback. I like this part a lot because this is the phase where I have the most context. I very often edit or even delete some of my comments because at the end when I have all the files in my head some things make a better sense and I don't have to ask about them. What's a little bit frustrated at github.com is the lack of compact view of my comments so far. Or the so called pending comments. GitHub allows me to create code review comments that only I can see. That's a wonderful idea because it exactly gives me the opportunity to carefully shape my code review without spamming my colleagues. However, I can get a summary only if I go back to the Conversation tab. And even there I see my pending comments next to the git diffs which they address. This makes the summary quite long. I felt that this is not needed since I just made the comments and only the name of the file and the actual text of the comment is enough. My step to address this little problem is to add the pending review summary onto both places - the main PR page (which I called "Timeline" and the "Files" tab).
The summary is compact card containing only the file names and the comments' body.
Re-building the context
As I mentioned above the biggest problem with having multiple pull requests in flight is the context switch. And it gets worst over time because the code review is an on-going process. There are iterations happening. We have to remember not only that first initial context but also what is happening afterwards. What we asked for and the discussions that follow up. Very often our comments lead to code changes that amend the shape of the whole pull request. Our brain becomes like a small git repository. We have to remember the history of the changes and their origin.
When working with github.com I constantly have to re-scan the whole PR to understand what is new. What are the new comments, new commits and what they bring in. This is a massive effort because not only I need to re-build the context but I have to grown up on it. This is the most frustrated bit of my code review process.
The way of how IGit solves this problem is to remember what is seen and visually separate it from the new content.
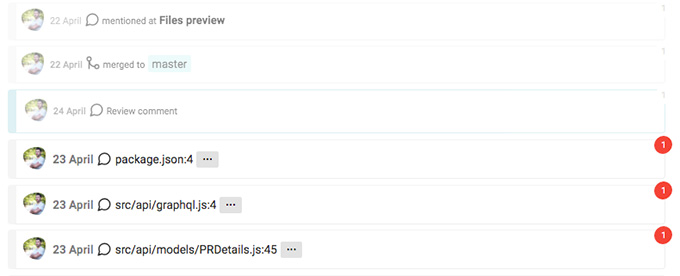
There is a small bubble with a number in it. If it is red it means that it is unread. If we click it the app will get the id of the event and will store it locally into a IndexDB database. Every two minutes IGit requests GitHub's API and gets the PR's data again. It compares the data locally with what's coming from the outside and shows the new items. The app also dims the read events so I can even better separate the new stuff from the old ones.
I know that GitHub has something similar. They show us what is new but it is not clear on what criteria. How they consider something as "new"? I think that the right approach is to leave this decision to the developer. For example the red bubble that we see on the screenshot above must be clicked in order to indicate that the comment is checked. Without clicking it the event stays unseen. That brings another tool to my code review process. I can easily filter stuff that are clear to me and leave some other for later resolution.
Marking something as seen is not the end of the story. Even though the app dims it we can still see it as a normal unread item by clicking on the small eye icon next to it. Or even bring it back as unseen item.
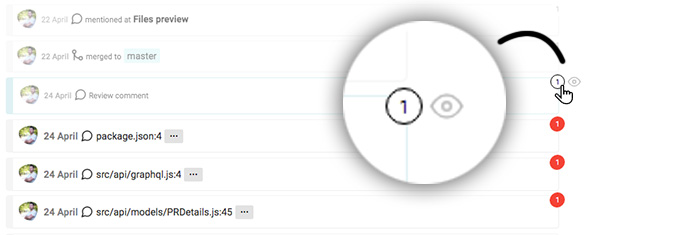
It happens to me very often that I make something again red as a reminder that I have to take some actions.
Because IGit holds all the repositories and all the pull requests and knows what is checked and what not it may show that little bubble everywhere. This helps when we look at the overall picture and we want to identify where is the progress happening. Here is how the sidebar looks like when we have new events:
Another small feature made my code review experience even better. The app changes its tab title to indicate when there are new events.

So far I was constantly checking my email and I carefully looked for messages from GitHub. Every email from them means that something on my projects happened. The thing is that I'm part of an organization and I receive bunch of unrelated emails. For example in 90% of the cases I don't need to know details about what our back-end team is doing. But I do receive information about their PRs. For a very long time I was using my mail client as a tool that tells me what's new in GitHub. Now IGit does this for me.
How
As we know every complex app has several layers that communicate between each other. The first one that I worked on was the data layer.
The data layer
The data layer consist of several parts:
GraphQL queries
I have a small function that does the request to the GitHub's API and a bunch of normalization helpers so I transform the data into a better format for React.
const requestGraphQL = async function (query, customHeaders = {}) {
  const res = await fetch(endpointGraphQL, {
    headers: Object.assign({}, getHeaders(), customHeaders),
    method: 'POST',
    body: JSON.stringify({ query })
  });

  if (!res.ok) {
    throw new Error(res.status + ' ' + res.statusText);
  }
  const resultData = await res.json();

  if (resultData.errors) {
    console.error(resultData.errors);
    throw new Error(resultData.errors.map(({ message }) => message));
  }
  return resultData;
};
Nothing unusual. A simple fetch call to https://api.github.com/graphql endpoint. The interesting moment here is that some of the endpoints are in a preview mode. This means that they are available and they work but they may change. Because of that we have to pass an additional header:
Accept: 'application/vnd.github.starfire-preview+json'
It took me some time to understand that. Probably because I didn't pay enough attention to the explicitly written warning.
Persistent data
There are couple of things that need to be persistent - user profile, access token, subscribed repositories and a list of events which are seen/read. I didn't want to spend time designing a back-end solution for this project so decided to use the browser's IndexDB interface. At the end IGit is an app that helps individuals not a team.
I picked Dexie.js as a library for managing the local database. It is pretty well documented and looks solid for my case. Just as an example, here is the code that I'm using to set/get user's profile:
const db = new Dexie('igit');

db.version(1).stores({
  profile: '++id, token, name, avatar, login',
  repos: '++id, name, repoId, nameWithOwner, isPrivate, url, selected, owner',
  notifications: '++id, objectId'
});

api.setProfile = async function (profile) {
  db.profile.add(profile);
};
api.getProfile = async function () {
  const res = await db.profile.toArray();

  if (res.length === 0) {
    return null;
  }
  return res.shift();
};
Local storage
There are a few small settings that are mainly UI related. For those I used localStorage API.
By design the application is 100% living in the browser. There is no back-end. The data that is rendered is fetched from GitHub's API in a polling fashion. What needs to be persistent is saved locally on the user's machine using browser APIs.
Data flow
React hooks API is a wonderful idea. It eliminates a lot of boilerplate and make the code more functional. What I found though is that it is not enough to build a complex app. That is because it works on a local level. And this is fine because that new API is addition to React. In terms of data flow nothing changes. We still need some tool that will allow us to have application state and will give us instruments to manage that state. Here I decided to reinvent the wheel and write my own library. I did it because is fun and more importantly because I was seeking deeper understanding of how the hooks work.
In the beginning I kept the code of my data flow helpers inside the app. At some point I extracted them into a separate repo and publish them to npm. The library is called Jolly Roger and mimics the hooks API naming. Under the hood still uses the same things but has a single store and provides a single context that may be accessed by each of my React components. Example:
import roger from 'jolly-roger';

export default function App() {
  const { initialize } = roger.useContext();
  const [ profile ] = roger.useState('profile', null);
  const [ repos ] = roger.useState('repos', null);
  const [ notifications ] = roger.useState('notifications', []);

  useEffect(() => {
    initialize();
  }, []);

  if (profile === null) {
    return ;
  } else if (profile === NO_TOKEN) {
    return ;
  }
  ...
This is the main component of IGit. It pretty much access all the different slices of my application store. The state and the context used here is not local. It is globally available and the same for every component.
To add something into the context there is a roger.context method. Here's how the initialize method looks like:
roger.context({
  async initialize(action, { setProfile, setRepos, setNotifications }) {
    setProfile(await api.getProfile());
    setRepos(await api.getLocalRepos());
    setNotifications(await api.getNotifications());
  }
});
setProfile, setRepos and setNotifications are also registered into the same context but they are functions that trigger behavior into reducers. Or in other words those are my actions. They are defined via the roger.useReducer:
roger.useReducer('profile', {
  setProfile(oldProfile, newProfile) {
    return newProfile;
  }
});
Here I don't care what was the previous oldProfile and simply return the new one.
Because the actions are also added to the context I can easily access setProfile from within a React component. There is no a connect function as it is in Redux. I can simply write:
const { initialize, setProfile } = roger.useContext();
const [ profile ] = roger.useState('profile');
And calling setProfile will trigger the reducer which will update the state and because of that the React component will be re-rendered with the new profile.
Jolly Roger is really small abstractions on top of the React hooks. It's just 2KB gzipped. The only difference is that it works on a global application level. We can achieve the same if we use a single useState and useReducer at the very top component. If you want to learn more check out the official repository.
Tricky rendering
Most of the data that I want to display is simple. Lots of lists of things like repositories, pull requests, users. There are block of text like pull request description and comments. However, there is one thing which needed more efforts - the git diff. It looks like that:
diff --git a/Header.js b/Header.js
index 282f19c..dcb8575 100644
--- a/Header.js
+++ b/Header.js
@@ -2,6 +2,6 @@ import React from 'react';

 export default function Header({ children }) {
   return (
-    This is a title here
+    This is a title here.
   );
-}
\\ No newline at end of file
+}
This is basically the text that all this pull request thing is based on. It's a comparison between two branches. First I thought that I'll do this myself too but it is quite a challenge. There is a spec that helps but still we need to cover a lot of cases. I tried couple of libraries and the best one that fits my need is gitdiff-parser. It has 0 documentation but it deals so far pretty well with all kind of diffs. I don't really remember how I found it but I'm glad that I did because it solved an important problem for me.
Where
From the very beginning I had an idea where I'll deploy IGit. I already used the same service for another project and I was extremely pleased with it. That is Zeit's serverless platform. I know that there are some popular alternatives out there but Zeit's now is just so easy to work with. I'm literally three letters away from deploying my application on the internet. In this section I'll show you all the steps that lead to today's igit.dev.
The three letters deploy
I did nothing else but jumped to igit directory in my terminal and run now. The result was:
ᐅ now                                                                                1 ↵
> WARN! Your project is missing a now.json file with a `version` property. More: https://zeit.co/docs/version-config
> Deploying ~/Work/Krasimir/igit under krasimir
> Using project igit
> https://igit-cmg5gcbp8.now.sh [v2] [4s]
┌ **        Ready               [1s]
├── dist
├── scripts
├── site
└── src
> Ready! Aliased to https://igit.krasimir.now.sh [in clipboard] [7s]
It's simple as that. Notice the last line. In my clipboard I had igit.krasimir.now.sh. I pasted it in my browser and boom - I got my stuff deployed on a nicely looking domain under https for a 7 seconds. I can navigate to the dist folder and see IGit working. A super quick preview of what I did so far.
From preview to a working product
The above command indeed put my stuff on Zeit's servers and IGit was accessible over the wire but that was definitely not enough. First my app was available under /dist folder where I wanted to be under /app. Also I had plans to change the paths of the bundled JavaScript and CSS from ./bundle.js to just /bundle.js and clearly I had to instruct Zeit for that.
I created a now.json file in my root directly that does everything else. The file's content was something close to this:
{
  "name": "igit",
  "version": 2,
  "builds": [
    { "src": "dist/**/*.*", "use": "@now/static" },
    { "src": "be/*.*", "use": "@now/node" }
  ],
  "routes": [
    { "src": "/now", "dest": "/be/getTime.js" },
    { "src": "/app(.*)?", "dest": "/dist/$1" },
    { "src": "/(.*).css", "dest": "/dist/$1.css" },
    { "src": "/(.*).js", "dest": "/dist/$1.js" },
    { "src": "/img/(.*)", "dest": "/dist/img/$1" },
    { "src": "/(.*)", "dest": "/dist/index.html" }
  ]
}
Then when I run now I got the following:
ᐅ now
> Deploying ~/Work/Krasimir/igit under krasimir
> Using project igit
> Synced 12 files (234.16KB) [1s]
> https://igit-rdc2hmq3w.now.sh [v2] [5s]
┌ dist/**/*.*           Ready               [1s]
├──
└── dist/index.html
┌ be/getTime.js        Ready               [17s]
└── λ be/getTime.js (166.86KB) [sfo1]
╶ 2 builds hidden       2 Ready             [14s]
> Ready! Aliased to https://igit.krasimir.now.sh [in clipboard] [26s]
Let's dig deeper in what now.json contains and see what happened. There are two important fields in there - builds and routes. The first one tells Zeit what kind of builder needs to run for specific file/files. In my case I need @now/static and @now/node (we'll talk about this one in a bit). The second field routes defines the resources in my application by wiring URL paths to actual files. So, Zeit's routing mechanisms now know what URLs to expose, what stands behind them and how to process the uploaded code.
The @now/static builder is simply serving the files as a static resource. It's like I uploaded a file on a FTP server. The other one @now/node is the essence of the serverless idea. It process JavaScript lambda files. Here is my getTime.js:
const JSONResponse = res => (data, status = 200) => {
  res.setHeader('Content-Type', 'application/json');
  res.setHeader('Access-Control-Allow-Origin', '*');
  res.statusCode = status;
  res.end(JSON.stringify(data));
};

module.exports = (req, res) => {
  return JSONResponse(res)({ now: new Date().getTime() });
};
If you ever wrote a node server you'll recognize the request and response objects. What happens to this file is that it gets transformed to a working server responding to /now URL and giving me back a JSON with the current time. Check it out here https://igit.dev/now. I needed such a simple endpoint while I was explaining jolly-roger in another article. getTime.js is extremely simple and silly example and probably doesn't show the full power of such architecture. But I strongly encourage you to try it and deploy something on Zeit. If you never work with serverless applications you'll need to do a small mind shift but it definitely worths it. I for example did write bunch of complex lambdas while working on Poet. It makes you think about so much less things and lets you focus only on the business logic of your product. All the stuff like who is running the server, how is running it, scalability, reporting are just handled by Zeit. You focus only on your app's logic.
Putting everything under my domain
I bought igit.dev from Google (you can buy domains from Zeit directly by the way) and followed these three steps:
- 1. I set the correct name servers (The Zeit ones)
- 2. I verified my domain with
now domains verify <domain></domain>command - 3. I set the alias in my
now.jsonas"alias": "igit.dev"and I runnow --target production. Zeit will pick whatever is in mynow.jsonand will alias the latest deployment to that domain.
Those are the three steps of the IGit deployment to Zeit's platform and to be honest it never felt so easy to deploy something.
At the end of this section I want to stress out on something - not only the process of deployment is easy but the whole service is quite cheap. For example my bill for April having two projects is just $1.97. That is because the serverless architecture spends resources on demand. I'm literally paying only if someone is using my stuff.
Conclusion
It took me roughly two months to make IGit. I don't regret for the spent time. It was quite fun, I learned bunch of things like how to use GraphQL and got a better understanding of React Hooks. At the end I have a tool that speeds up my code review process.
The project is available here https://igit.dev/ and I'll be more then happy if you try it and let me know what you think. It is also open source at https://github.com/krasimir/igit so feel free to post issues or who knows, maybe a pull request.