A modern React starter pack based on webpack
Checkout React webpack starter in GitHub.
You know how crazy is the JavaScript world nowadays. There are new frameworks, libraries and tools coming every day. Frequently I’m exploring some of these goodies. I got a week long holiday. I promised to myself that I’ll not code, read or watch about code. Well, it’s stronger than me. React werbpack starter is the result of my no-programming week.
At work we started using React and because webpack is a hot topic I decided to create a startup kit. All the modules that we need for developing React applications bundled with webpack.
NPM as a task runner
We’ll use webpack as a build tool but I prefer creating one layer on top of it. The npm scripts are really nice way of defining tasks. The biggest benefit of doing this is that we may change the tool but keep the command. So all our deployment configuration stay untouched. Here is what we’ll end up with:
"scripts": {
  "dev": "WEBPACK_ENV=dev ./node_modules/.bin/webpack --watch --inline",
  "build": "WEBPACK_ENV=build ./node_modules/.bin/webpack",
  "test": "karma start",
  "test:ci": "watch 'npm run test' src/"
}
npm run dev will start webpack in watch mode. It will monitor for file changes and will rebuild everything. --inline is needed because of webpack-dev-server which we will discuss shortly. npm run build does the same thing but only once. Notice that we set a WEBPACK_ENV variable. By doing this we pass parameters to webpack’s config file which will come handy during the building process.
The last two scripts are for our tests. They are based on Karma runner.
Compiling the JavaScript
Back in the days we were only concatenating files. Nowadays, especially with React, we need more than that. Facebook’s library has its jsx syntax and we probably want writing JavaScript using ES6 features so it gets a little bit complicated.
webpack has loaders. These are external modules that we use to preprocess our files. If we need something that is not included in webpack by default we use a loader. In our case we’ll add babel-loader. webpack similarly to Gulp and Grunt has a configuration file - webpack.config.js. Here is how ours starts:
var webpack = require('webpack');

var appName = 'app';
var outputFile = appName + '.js';

var config = {
  entry: './src/index.js',
  devtool: 'source-map',
  output: {
    path: __dirname + '/lib',
    filename: outputFile,
    publicPath: __dirname + '/example'
  },
  module: {
    loaders: [
      {
        test: /(\\.jsx|\\.js)$/,
        loader: 'babel',
        exclude: /(node_modules|bower_components)/
      }
    ]
  }
};

module.exports = config;
The source files which are written with ES6 syntax and may contain jsx are placed inside src directory. The output goes to lib directory as app.js. There is also source map generated - lib/app.js.map file.
If we run npm run dev in the console we will see:
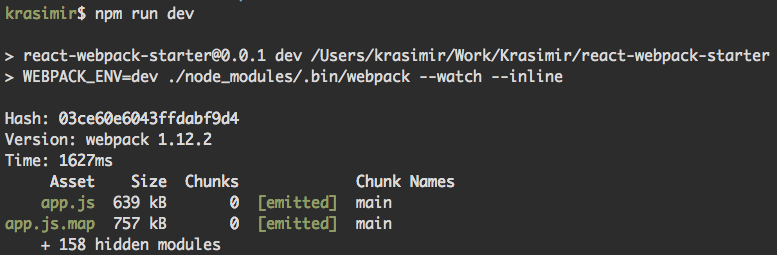
The script is waiting for changes and every change in some of the files fires compilation.
Minification
Let’s continue by creating a minified version of our bundle. That’s a must have part of our setup. Along with loaders webpack supports plugins too. Once of them is called UglifyJsPlugin and does exactly what we need:
...
var UglifyJsPlugin = webpack.optimize.UglifyJsPlugin;
var plugins = [];

plugins.push(new UglifyJsPlugin({ minimize: true }));

var config = {
  entry: './src/index.js',
  devtool: 'source-map',
  output: ...,
  module: ...,
  plugins: plugins
};

module.exports = config;
That’s all nice but if we run npm run dev we’ll get app.js containing minified code. What we want is having app.js and app.min.js next to it. To achieve this we will use the WEBPACK_ENV variable that comes from the terminal:
var UglifyJsPlugin = webpack.optimize.UglifyJsPlugin;
var env = process.env.WEBPACK_ENV;

var appName = 'app';
var plugins = [], outputFile;

if (env === 'build') {
  plugins.push(new UglifyJsPlugin({ minimize: true }));
  outputFile = appName + '.min.js';
} else {
  outputFile = appName + '.js';
}

var config = {
  entry: './src/index.js',
  devtool: 'source-map',
  output: {
    filename: outputFile,
    ...
  },
  module: ...,
  plugins: plugins
};

module.exports = config;
We get the value of WEBPACK_ENV and decide if webpack should produce a development version or production version. If we run npm run build we will get app.min.js and app.min.js.map generated. We still have npm run dev available while we work locally though.
Linting
The most important part is done. We could write React components and everything is bundled. Let’s continue with linting our code. That is a process of analyzing that gives us warnings for potential errors. There are several tools for that and one of the most popular one is ESLint. There is eslint-loader available:
// in our webpack.config.js
...
module: {
  loaders: [
    {
      test: /(\\.jsx|\\.js)$/,
      loader: 'babel',
      exclude: /(node_modules|bower_components)/
    },
    {
      test: /(\\.jsx|\\.js)$/,
      loader: "eslint-loader",
      exclude: /node_modules/
    }
  ]
}
...
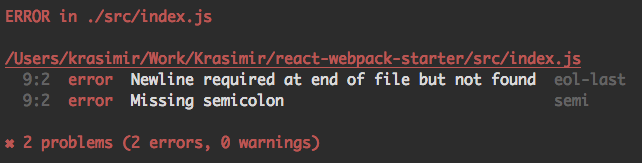
And we are done. If ESLint founds something will report it in our terminal. For example:
Running a local web server
webpack comes with webpack-dev-server. Well, it is a separate dependency but it integrates very well. Here are the changes that we add to our webpack.config.js:
...
var WebpackDevServer = require('webpack-dev-server');
var env = process.env.WEBPACK_ENV;

var host = '0.0.0.0';
var port = '9000';

var config = {
  ...
};

if (env === 'dev') {
  new WebpackDevServer(webpack(config), {
    contentBase: './example',
    hot: true,
    debug: true
  }).listen(port, host, function (err, result) {
    if (err) {
      console.log(err);
    }
  });
  console.log('-------------------------');
  console.log('Local web server runs at http://' + host + ':' + port);
  console.log('-------------------------');
}

module.exports = config;
We need the server running only in development mode so WEBPACK_ENV is used again. contentBase setting is defining the root of the server. That’s the directory where we have to place index.html file - the entry point of our application (checkout the repository in GitHub for details). Once the server is up we have http://localhost:9000/ available and we may load that URL in our favorite browser.
Testing
So far we did bundling, linting and running a local dev server. However, there is one bit missing - testing setup. I see that lots of starter packs do not contain such a thing. It is important to have it though and I’m sure that it takes to everyone.
webpack is a bundling tool. It is not a testing framework or task runner. So every try using it for running the tests is either complicated or doesn’t work well. That is why we will use Karma runner. It makes possible running headless browsers or real ones from the terminal. It has its own karma.conf.js configuration file and here is how ours looks like:
var webpackConfig = require('./webpack.config');
webpackConfig.devtool = 'inline-source-map';

module.exports = function (config) {
  config.set({
    browsers: [ 'PhantomJS' ],
    singleRun: true,
    frameworks: [ 'mocha', 'chai', 'sinon', 'sinon-chai' ],
    files: [
      'tests.webpack.js'
    ],
    plugins: [
      'karma-phantomjs-launcher',
      'karma-chai',
      'karma-mocha',
      'karma-sourcemap-loader',
      'karma-webpack',
      'karma-mocha-reporter',
      'karma-sinon',
      'karma-sinon-chai'
    ],
    preprocessors: {
      'tests.webpack.js': [ 'webpack', 'sourcemap' ]
    },
    reporters: [ 'mocha' ],
    webpack: webpackConfig,
    webpackServer: {
      noInfo: true
    },
    autoWatch: true
  });
};
Lot’s of stuff out there. Let’s go through the file and clarify what Karma needs.
We start by requiring the config file of webpack. That’s needed because we have to bundle our JavaScript before sending it to the browser. We need to overwrite devtool property so we make the source maps work. We choose PhantomJS as our browser and define all the frameworks that will be available globally in our scripts.
Because we are using loaders while producing our bundle we need to create a webpack context file. Karma takes this as a entry point.
// tests.webpack.js
var context = require.context('./test', true, /.+\\.spec\\.jsx?$/);

require('core-js/es5');

context.keys().forEach(context);
module.exports = context;
The runner has its own reporter but Mocha’s one is (I think) better. Writing reporters: [ 'mocha' ] will make Karma display the results in a nicer way.
There are two modes of running Karma:
npm run test- the runner fires the tests only once and existsnpm run test:ci- same as above but it continues listening for file changes
The file monitoring is done via the watch module.
Final notes
I didn’t go through every details in the starter kit (mainly because I’m lazy) but I’ll suggest forking react-webpack-starter and try it.
Here is the full list of the used dependencies:
"devDependencies": {
  "babel-core": "5.8.24",
  "babel-eslint": "4.1.3",
  "babel-loader": "5.3.2",
  "chai": "3.3.0",
  "core-js": "1.1.4",
  "eslint": "1.4.3",
  "eslint-loader": "1.0.0",
  "eslint-plugin-react": "3.4.1",
  "karma": "0.13.10",
  "karma-chai": "0.1.0",
  "karma-chai-plugins": "0.6.0",
  "karma-chai-sinon": "0.1.5",
  "karma-chrome-launcher": "0.2.0",
  "karma-mocha": "0.2.0",
  "karma-mocha-reporter": "1.1.1",
  "karma-phantomjs-launcher": "0.2.1",
  "karma-sinon": "1.0.4",
  "karma-sinon-chai": "1.1.0",
  "karma-sourcemap-loader": "0.3.5",
  "karma-webpack": "1.7.0",
  "react": "0.13.3",
  "watch": "0.16.0",
  "webpack": "1.12.2",
  "webpack-dev-server": "1.11.0"
}